"Shop Blog" from SPDTool. This blog will feature pictures, videos, and other projects being done in the SPDTool shop.
Saturday, July 31, 2010
V-Carve Experiments
I've been wanting to play with the V-Carve capabilities of the BobArt software. This was made with a 1/8" endmill to clear and a plain old 3/8" 90 degree chamfer cutter. It is cut to .125" depth. The program did a nice job making a 3-D effect on the lettering. The sign is for the "Epiphany Rock" - a 700lb piece of white quartz that was being discarded after the previous owners' disturbing attempt to break it with a 12lb sledge were thwarted. It had a sign saying "U-Haul" that Val spotted so I retrieved it with the tractor and we put it where I can see it from the shop window. It is a nice place to sit and think about machining problems...
Tuesday, July 27, 2010
Slow Progress
I have been doing a lot of CAD/CAM work on the next tool, so not a lot to show...
I cut and finished blocks to length, and started working out the cutting and decided to start doing some more extensive software setup. The goal being to be able to pick a drill size in BobCAD, and have it generate the correct speed (rpm) and feedrate (inches per minute or inches per revolution) to get a nice clean, smooth hole. This is easy to do with a regular drill or drill press where you can "feel" the cut and watch the chips, but it is much more sophisticated to be able to click on "START CYCLE" and have the machine run the whole drill cycle.
The tables in books are only an estimate, you have to try it and see how it works under YOUR conditions and adjust the software accordingly. While I was working on that, the spindle decided not to start. When I opened the door to the inside of the machine I found the main electrical contactor (big relay) for the spindle had come apart (worse than in the picture) ! It was easy enough to snap it back together and get it working, but this is not a good component to come apart.
I Emailed the manufacturer Tormach and the tech reported that contactors should not "spontaneously dis-member" and got one out to me right away under warranty - less than an hour from my first Email. They have been an excellent company to deal with and I am glad I bought their product.
Thursday, July 22, 2010
Different kind of cutting Today
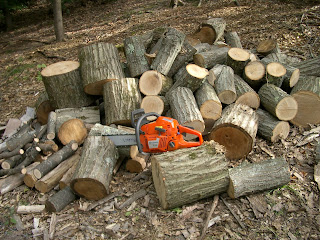
We finally had a "cool breeze" day in the low 80's so I worked on more of the thunderstorm damage cleanup. This is two oaks - there are 4 or 5 more to go.
Tooling used today was Husqvarna 357XP with 20" bar. It runs at 14,000rpm, outputs 4.4hp and weighs 12 pounds.
Tuesday, July 20, 2010
Quick Proof for a friend
The President of Arsenal Consulting is considering throwing some work my way. He sent me his logo and here is what I whipped up. Arsenal is the "Go To" firm for forensic computer work in the Boston area.
Monday, July 19, 2010
Finished Prototypes
I finished up the machining on Friday, then the impending thunderstorms passed through and I shut down.
The assembly went OK, but I need to mill the magnet holes a little larger so they are easier to press in.
These are small cleaning kits. They measure 2.6"long, are 1" wide and .625 (5/8") thick.
They contain a pull-cord style cleaning assembly that can attach to a standard brush - the block will hold a .45 cal brush.
There is a removable brass scraper and an ampule to hold a teeny bit of oil - enough for a light lube and wipedown. The threaded brush holder and the ampule are parts that are used in the Samson Field Survivor tool.
If you coil the wire carefully you can stuff a patch into the other half of the block.
I have used it and it works pretty well. Who knows if there is a market for it.
There are a few more changes I still want to make to this design.
Thursday, July 15, 2010
Software Crash !!!
I was trying to work on some tool paths and my CAD/CAM software (BobCAD) crashed and managed to mangle the license file...
Fortunately I already had created the G-code programs and it didn't slow me down much. I placed a support call and got it resolved later in the afternoon.
The only casualty for today was a 3/16" x 1" long carbide endmill. I got a LOT of pretty deep cuts done with it and it was starting to get dull, so its time had come.
Here are some pictures of the process. The first one is setting the Z. This handy tool is stupid-simple. When the bit touches the spring-loaded top, the light goes on (duh). It is exactly 2" tall so you just set the DRO (Digital Readout) for Z to be 2". It is a lot easier and faster for me to do it this way than trying to see exactly when the bit touches the part and setting to 0. You can connect a wire to it and use it for the same purpose on non-conductive materials (plastic, wax, wood...). They cost about $100 but are well worth it. It uses a 1.5v flashlight bulb and a standard 357 watch battery. The other picture are the blocks I worked on today. The plan is to add a few more holes, engrave logos and assemble them tomorrow. I'm not saying what they are just yet...
Wednesday, July 14, 2010
A 3D-engraving Project
Welcome to SPDTool Time !
I am going to start putting up pictures and videos from the SPDTool shop. Some of these projects are prototypes, and others are projects I am working on for friends. Most are built with my Tormach PCNC 770 mill. I am still learning how to use it and also trying to get up to speed on BobCad - the CAD/CAM package I am running.
Subscribe to:
Posts (Atom)